Pages

Wednesday, June 13, 2012

Busy As A Bee

I'm either off to the post office, home depot, second hand building materials, or goodwill. As you have probably noticed I have posted a few DIY projects and I am in the process of more as well as fixing the house. So! This means I have been so busy and I like it because I wouldn't want my summer to be boring!
I am searching for nice kitchen cabinets for the cheap on either craigslist or the second hand store and boy are they hard to find! My parents have a very tiny kitchen, which they like because they don't need a lot of space. While I try to find cabinets I am also working on moving my mom's craft room into a larger room (my room). The room she is in now is sooo tiny and because I'm now in school I don't need a room anymore. So the small room her crafts are in now, will be turned into the guest bedroom. I'll post before and after photos for sure!! It's gonna be awesome even if it takes a month!! (:


As I watch the news I just have to share PabLove with you. They raise money to buy cameras for young children with cancer. 
-Katie

Sunday, June 10, 2012

Did It Myself...Geo Necklace

Monkey see monkey do! I saw this cool geo necklace on pinterest and thought.... I can make that!!! I bought all my supplies at Joann for less than $10!!! I used Sculpey Premo clay, which was on sale for about $1.25, black chain, a black clasp, and black jump rings.


Step One.

 Materials include polymer clay, chain, clasp, jump rings, and a skewer or needle (to make a hole).


Step Two.
Cut clay into cubes using either a knife or fishing line. 

 Step Three.
Use something to cut the cube into a geo shape. I used a scrapbook spatula/scraper if that makes sense. It's a flat thin surface excellent for cutting. 

This is what my beads look like. It's kind of hard to make a crisp cut without rounding the edges.

Step Four.
 Take your skewer or needle and make a hole large enough to fit your chain through.

Step Five.
Bake your clay! Read the directions for the brand of clay you have. I have sculpey premo and baked it for 30 min at 275 degrees. 

Step Six.
Thread the chain through each bead.

Step Seven.
 Cut your chain to the desired length and add clasp and jump ring.

Tadaaaaa!!!


Hope you enjoyed this tutorial. I would love to hear your comments!


-Katie

Saturday, June 9, 2012

Did It Myself..Braided Seed Bead Necklace


And so can you!!! I was inspired bygone other than pinterest!! I saw THIS necklace and said "I can make that!!" So... I did. I had left over seed beads and jewelry supplies so I didn't have to make a run to the store. t made my own version and wanted a thicker strand so for the first time ever I did a 5 strand braid. I looked up how to make a 5 strand braid HERE and picked a braid that I liked. First I played around with the different braids and ended up braiding the second example. 

Step One. 
 I used seed beads, chain, a clasp, three jump rings, fishing line, 10 clam shells, and jewelry glue.


Step Two.
Measure and cut your fishline. I cut my fishline really long because I wasn't sure how long I wanted my necklace. 


Step Three.
Tie three or four knots at one end of your fish line.

Step Four.
String a clam shell to your line. Imagine the clam is eating the knot. 

 Step Five.
Start stringing your beads!!!  String as many beads as you want your necklace long. This was the longest step for me. To string these tiny beads I found it easiest to just fish for the beads by holding the line close to the end for stability and "hooking" it into the beads as I tilted the cup.

 Step Six.
When you are finished stringing your first line, string another clam shell and tie three-four knots. Leave minimal gaps between seed beads so they are pretty tight on the line.

Step Seven.
Once you have made your first string with a clam on each end, add another string of beads by following step two-six. EXCEPT you are using the same two clams as your first strand.

By the end of step seven you will have two strands of beads together. 

Step Eight.
Repeat step two-seven four more times so you have a total of five double strands.


Step Nine.
Add glue to each clam "mouth" where the knots are and close with pliers. 

Step Ten.
Add a jump ring to your chain.

Step Eleven. 
 Add five clam shells to the jump ring. Use pliers to close each hook.


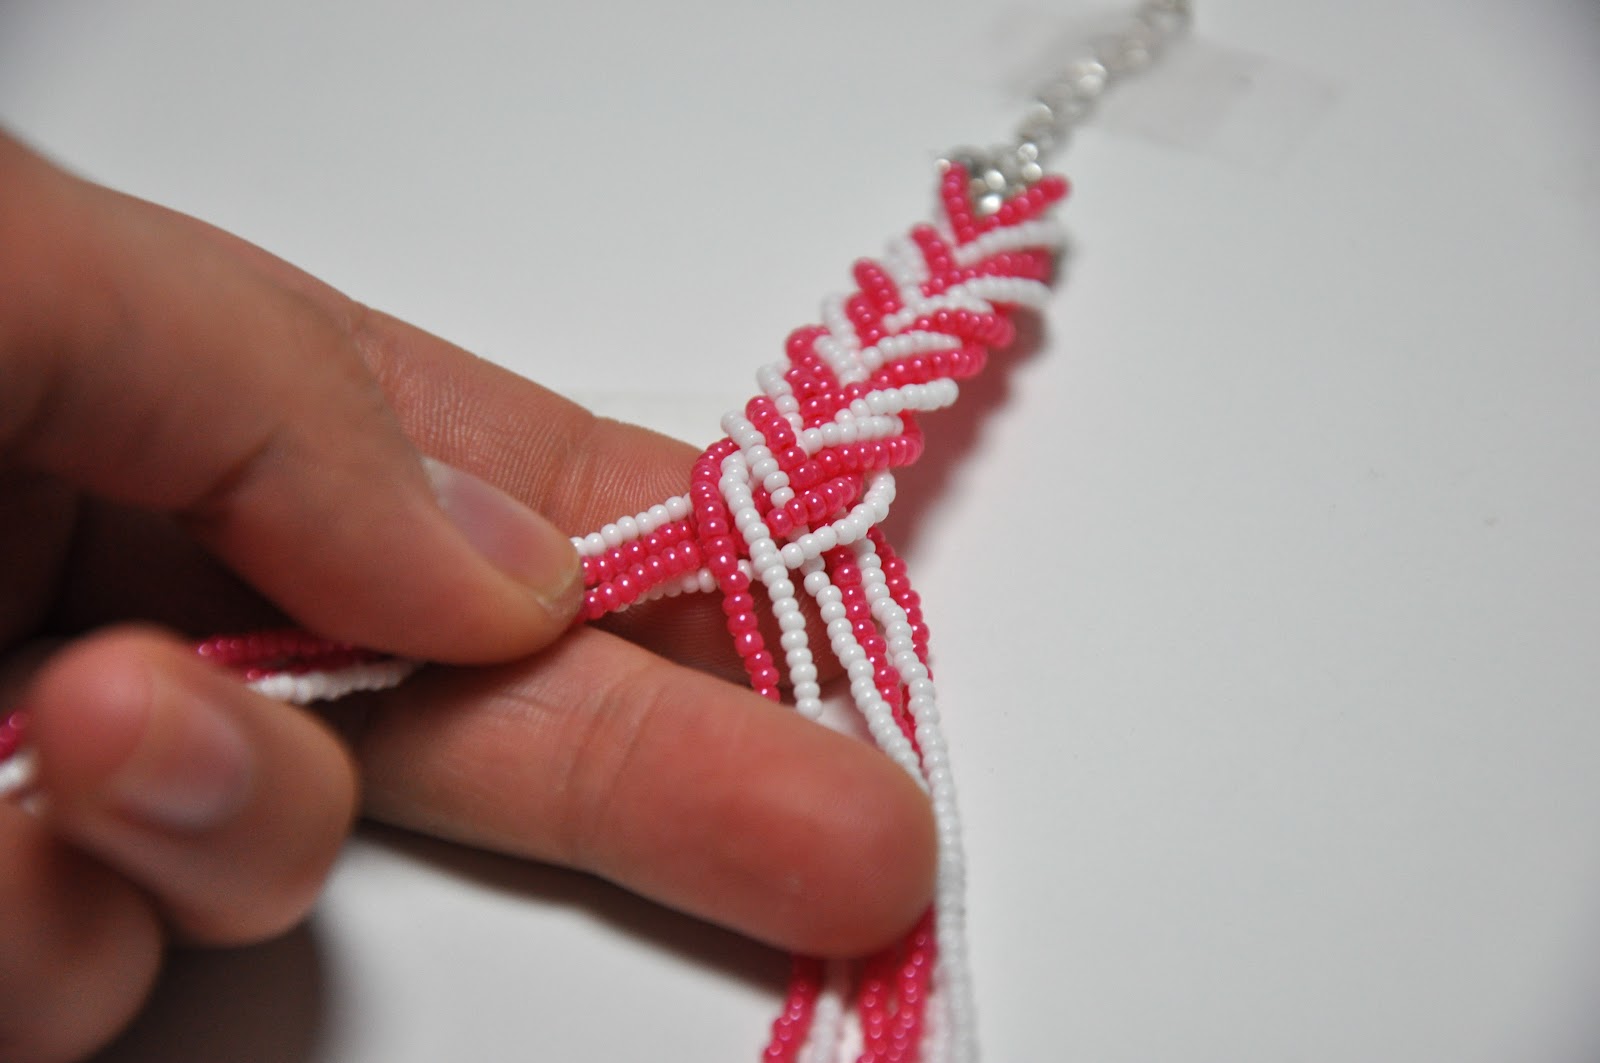
 It should look like this.

 I then taped the chain to a surface to braid.


 Step Twelve.
Start Braiding!! Once again I learned here to braid. I started out with this herringbone braid but wanted something thicker. So I chose the second example they show.

Step Thirteen.
Once I got to the end I'm not gonna lie...I got a little worried. I ended my braid as far to the end as possible.

 Step Fourteen.
I then Closed all the clam shells on a jump ring. It looked really messy, but because it's just braided I fixed it by loosening it backward. If that doesn't make sense then it's like I was working backward to make the whole necklace even.

Step Fifteen.  
With your last jump ring, open it and add both a clasp and the jump ring at the end of your braid.

Once you cut your chain to the desired length you are done!!


Tadaaaa!!


Hope you enjoyed this tutorial and I am happy to answer any questions.


-katie

Wednesday, June 6, 2012

Lady Bug Update!


Before...


After...


These little lady's went to town! I previously posted that my poor plant in our front yard had been infested with aphids. The solution .... Lady Bugs!!! Bought these little ones in a container at Mclendon's for about $11... which I thought was a little high, but I went ahead and tried it. I was unsure about how long they would stick around and thought that they would fly away once released. I was happy to find that they stayed for about a week!!!! It was kind of rainy and cold here so they huddled together a lot. Most have now left the nest and hopefully they left me some kiddos!!


So far so good!!


Saturday, June 2, 2012

Makeover Magic

Hey guys I'm excited to say that this blog is getting a makeover! Hopefully soon I will have a custom domain name...  I am still pondering over what to name this blog.
I might just change it to - The Polished Pup
I think it has a good ring to it don't ya say?
This blog was originally created for MadeJustForYou on etsy, but since then I have created another shop on etsy called UseMeAgainVIntage.
This new and improved makeover will include both shops, DIY tutorials, and my everyday life. I hope that you will make this transition with me. It will be a fun adventure!!


Thank you
-katie

DIY Bookend Makeover


Woohooo it's the weekend guys! This will be my first easy peasy DIY project I want to share with you. It's so simple, all you have to do is find a lacquer spray paint and paint an old bookend to make it look new again. I found this really cool horse head bookend. It had so many scratches I decided I could hide them and make it look even cooler by painting it white.


Lacquer spray paint- $4.98


SOOOOO many scratches! I would have never bought this if I didn't have the idea to paint it.


A couple coats and...


Tadaaaaa! Isn't it Beautiful! I have no space for it so guess what...it's for sale in my etsy shop. What I would do, to prevent the bookend from falling over, is place a small "L" bracket in the back so the books sit on the bracket for more stability.
This project is a reminder that everything has potential to look pretty again.
If you have any bookend projects i'd love to see them.
Have fun!
-katie

Thursday, May 31, 2012

Friend Connect?


If you see to the right my members gadget says this

"We're sorry...
This gadget is configured incorrectly. Webmaster hint: Please ensure that "Friend Connect Settings - Home URL" matches the URL of this site."

Does anyone know what this means and how I can fix my members gadget? Do I need google connect in order to see the members gadget? Looking on google it seems like they are doing away with google connect. Im confused. cans anyone help me?

thanks
-katie

Monday, May 28, 2012

Aphids Be Gone!!

Poor little plant... it's covered in aphids!! Didn't really notice them until now and it looks like an infestation! Only on one plant though. My solution...LADY BUGS. I bought some today at the local Mclendon store and hopefully they are the answer. Everywhere I read says that lady bugs love aphids so i am hoping that these lady bugs will save my plant. I'll keep you updated on how long it will take.


-Katie

The "do it yourselfer"

Growing up without much money and a dad who thinks he can build everything in order to save cash, has made me a "do-it-yourselfer". With my fairly new discovery of Pinterest and the unnecessary amount of college fees, I have found that my DIY self will come in handy. The only problem is finding money for these amazing projects along with paying my rent. 


There are so many things that I feel I need, but actually they are just things I want. Doesn't this always happen. I know I need a bed, a desk, a chair, and a dresser. Necessary right? I have a desk from home that I will use. Of course there was a DIY desk I wanted to make, but i'll just wait until I have an actual house. I figured I could save space and money by making a bed frame with storage underneath. This bed to be exact...


I can put baskets on the bottom to use as drawers. The only thing I plan on changing is the headboard. I found a tutorial on how to make a tufted headboard and it looks fairly easy. So far I have bought fabric and foam; all I need now is peg board and a button kit. I found clearance fabric in a coral color for $9 a yard. I had to buy two yards because it is thin and see-through. During the memorial day sale at Joanns I was able to snatch a little more than one yard of 2" foam for $15!!! instead of $30.99 a yard!!! 
There are a few modifications I would make, and when I do make it i'll be sure to post my own tutorial to share!
I would like to make this lampshade as well and put it on a simple floor lamp. 


By Katie


Stay creative!
-katie

Sunday, May 27, 2012

Feedback Love


MadeJustForYou has made and sold many items on etsy. To know the reaction of our customers really completes the order. We absolutely LOVE feedback and here are just a few of our favorites...


"Annie, I recieved the package on Friday morning. It is beautiful! Those are my daughter's school colors & went perfectly with her white cap & gown. You do terrific work... I will definately consider ordering more in the future!"

-Heather


"I was very happy with the resulting colors and all the work that went into making the stars for the lei. It turned out so nicely, and I was impressed with how sturdy it is, so it should hold up well if covered with other leis, as these celebrations go.

I will contact you again, if ever I need another lei."

Much aloha,
Carolyn


"The lei came out absolutely beautiful! My friend loved it and she got compliments all day, the day of her college graduation."


-Melissa


"This was my second time purchasing a lei from Annie, and I was equally thrilled with my own graduation lei as I was with my now-husband's lei a year ago. I got SO many compliments and it added the perfect special touch to my graduation gown."
"It was a delight working with this seller! After requesting a custom item, she had mock-up photos sent to me within hours and a listing posted in just a day or two. It was exactly what I wanted, and my fiancé will be wearing it when he graduates so I can pick him out of the crowd. The quality is great, and the shipping packaging helped it reach me safe and sound."


-Znasr (repeat customer)


"I literally screamed when I saw the Lei! it was so beautiful in person. Thank You so much for the fast shipping Annie!! The little stars that came along with it was also a very sweet surprise. I will of course be a returning customer! :) "


-Kim


"Thank you for your hardwork on the leis. They were a big hit at the event to kick off The Campaign for Hawaii's Children - Building the Future of Kapiolani Medical Center for Women & Children. I know you put in countless hours making each and every star and I want you to know we appreciated it! The leis were made beautifully and I would recommend you to anyone looking for a unique and different lei."


-Robyn


Not only do we love feedback on our store, but i'm sure other customers love to know personal experiences with us as well. It creates a sense of security that we provide fast, friendly, and quality work.


See you later alligator! 
-katie


Saturday, May 26, 2012

Out of a Deep Sleep.

Hello again!
  Blogging is back on track after my first year of college. During my first year I felt my inspiration was being blocked off by facts and numbers that I needed to memorize. The creative side of my brain started turning and I felt a need to blog! There is so much that has been tucked away in the nooks of my brain that there is an overload. Over the past year im sure many of you have heard of Pinterest. IM HOOKED. It's so handy... especially when friends pin and you know what to get them. I love the DIY, home decor, garden, and style boards. There are so many cool tricks that you can find on that site it's unbelievable!!

The etsy shop has a new look now if you haven't seen. I updated the banner! The photo is of our new stars that will be posted soon! They have a pink foil in the shape of the breast cancer ribbon.

What do you think?


See you later
-Katie

LinkWithin

Related Posts Plugin for WordPress, Blogger...